
If you’re part of a scrappy CPG startup, there’s one thing you know very well – you’re required to wear a lot of hats. And one of those hats is that of a product photographer. In the fast-paced world of food and consumer packaged goods, captivating imagery is a non-negotiable aspect of your brand’s success, particularly if you have an ecommerce site or a RangeMe profile.
However, building an in-house photography studio can be a daunting endeavor. In this comprehensive guide, we’ll unveil the secrets to crafting an efficient and cost-effective photography studio built for food and product photography. (Just a quick note: while I specialize in food photography, the tips and examples here also apply to all CPG products).
Keep reading to discover how you can transform your CPG brand’s visual identity and drive unmatched growth by leveraging a lean photography studio.
It starts with the camera (a real camera!)
The first thing you’ll need in your studio is, of course, the basic photography equipment. With today’s advancements in smartphone cameras, it may be tempting to reach in your pocket for your iPhone or Android device rather than your wallet to purchase a DSLR camera. However, while phone cameras have become very good in quality, they are still built for general use and give little control over the details that set the look of a professional image apart from that of an amateur.
Take the two images below as examples. The image on the left is shot with a DSLR and the image on the right is shot with an iPhone. They’re both using the same lighting, same angle, and same product. But you can see that the quality difference is pretty drastic.
The good news is, you can get a refurbished DSLR for much less than the cost of an iPhone. Check out the refurbished section of the Canon website for some options. When I started my photography journey, I bought a refurbished Canon Rebel that I absolutely loved. It took me all the way into the first year of professional photography and I was able to produce some amazing images with it for many years prior.
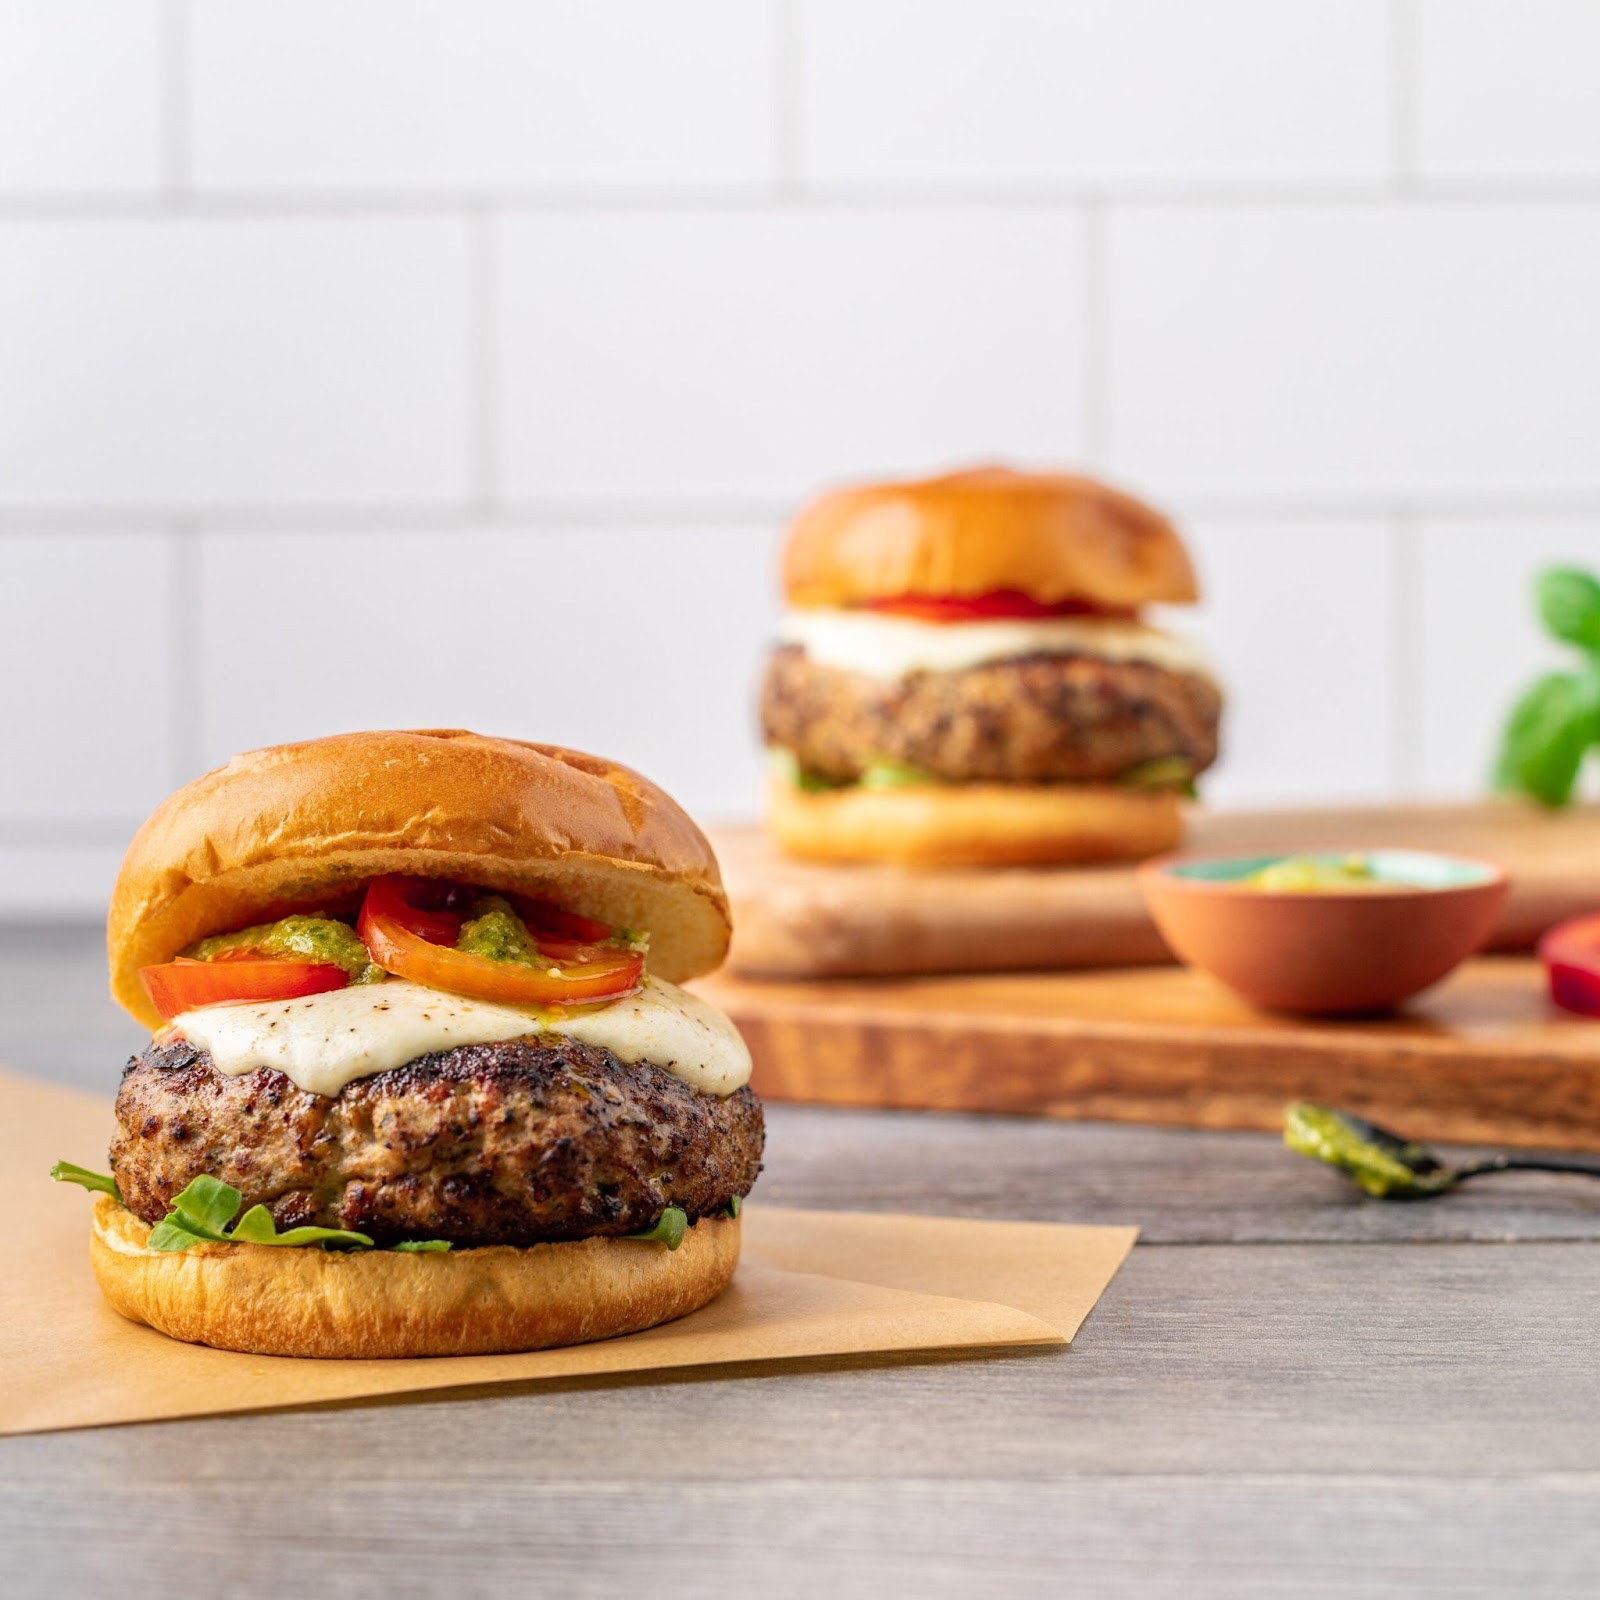
Next, you’ll want to pick up a very specific lens. It’s a lens all product and food photographers know well. It’s a 50mm lens but we all like to call it the nifty fifty. Why is it so great? Well, in layman’s terms: it’s cheap, it’s lightweight, it’s versatile for most food and product shots and it gives you the ability to capture a shallow depth of field (translation: more bokeh/blur around the focal point). Take a look at the image below. Do you see how the items in the back are blurred? That’s accomplished with a shallow depth of field.
Tripod
There are two main reasons to purchase a tripod for food photography. First, it’ll allow you to shoot in low-light situations. Which, unless you have the steady hands of a surgeon, will be a good portion of the time. A tripod will allow you to capture photos without registering the shakiness of your hands which would result in a blurry photo (and not in the good bokeh way).
The second reason is that it’ll help you properly compose an image. Composing an image means arranging the elements within the frame deliberately to create a visually appealing and balanced scene. It involves considering the placement of subjects, background and other elements to convey a specific message to the viewer. For example, you might have an image of a breakfast table with eggs, bacon and orange juice. If you remove the orange juice, or place it in a different area on the table, you have now just changed the composition.
When a camera is on a tripod, you have it fixed to a certain position pointing to your photography scene. You can then use that frame to arrange your composition and make small changes as needed. If you are shooting handheld, the slightest movement in your hand can change the composition – making it that much more difficult to get the right shot.
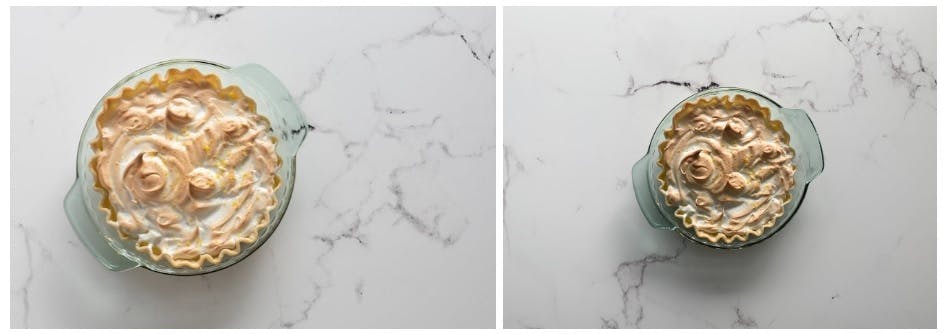
We recommend selecting a tripod that has overhead mounting capabilities like this one. This will allow you to do those oh-so-popular bird’s eye view tabletop shots as shown in the image below.
Table
When it comes to photography tables, you can really make any table work. But I’ve found that if you start with a smaller table, you’ll feel a lot more confined in your setup and will eventually upgrade to a larger one. A folding table like this one will do the trick. If you’re on a super lean budget, just use a table or desk you already have.
Lights
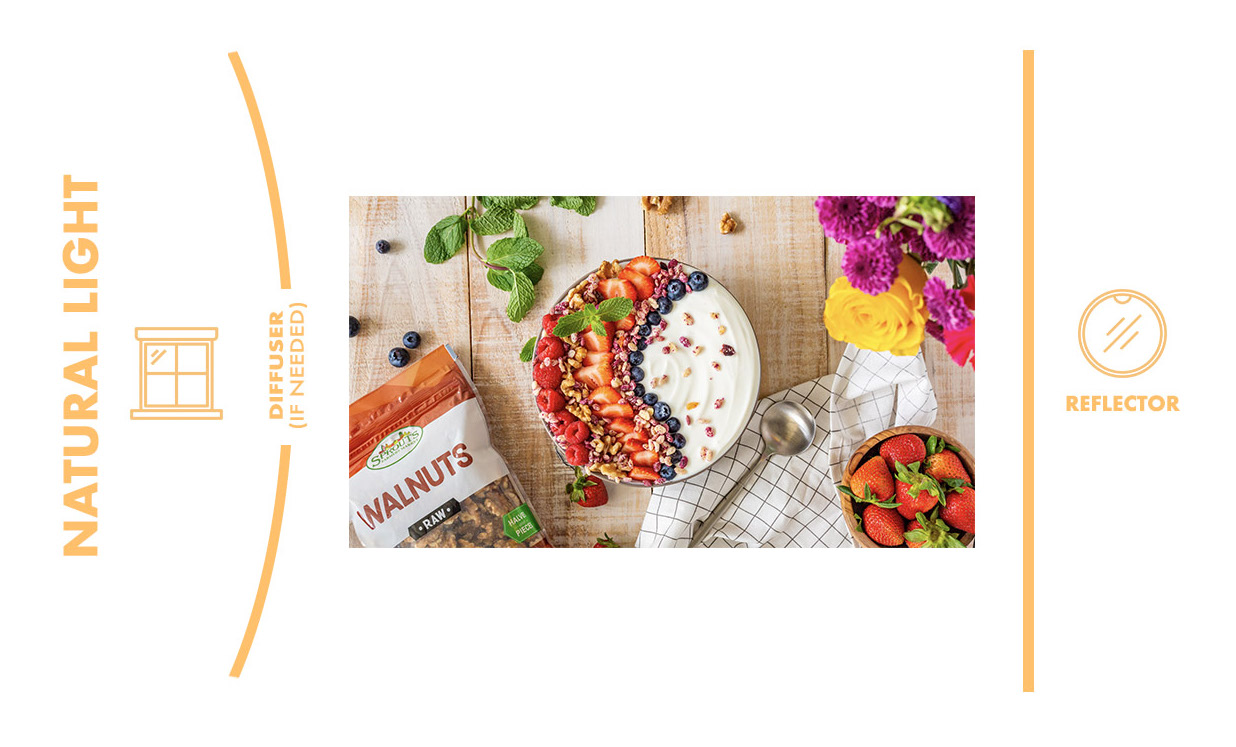
For the sake of keeping things cost-effective, my recommendation when you’re just starting out is to use natural light. That is, you’ll want to position your photography table next to a window and shoot when the sun is out. This will create one-directional light coming from the window that will give depth to the products.
If you are shooting with natural light and the window you’re positioned next to receives direct sunlight (is showing harsh shadows) and you’re looking for a softer look, put up a diffuser made specifically for photography or sheer curtains to soften the light and shadows. Put up a diffuser made specifically for photography, or simply a sheer curtain. If you purchase the photography diffuser, you may want to also purchase a stand and clamp – otherwise you will need a sturdy way of propping the diffuser up against your window.
As an optional accessory, on the opposing side of the light, you may opt to purchase a reflector to softly bounce the light back onto the products on the other side. A simple, foldable white board would get the job done here.
Avoid shooting completely outdoors. One thing many photography novices often assume is that all light is good light. That couldn’t be further from the truth. Getting the right type of light is an essential part of any good photo. When shooting outdoors, light is pouring in from all angles – making the image look flat and stale.
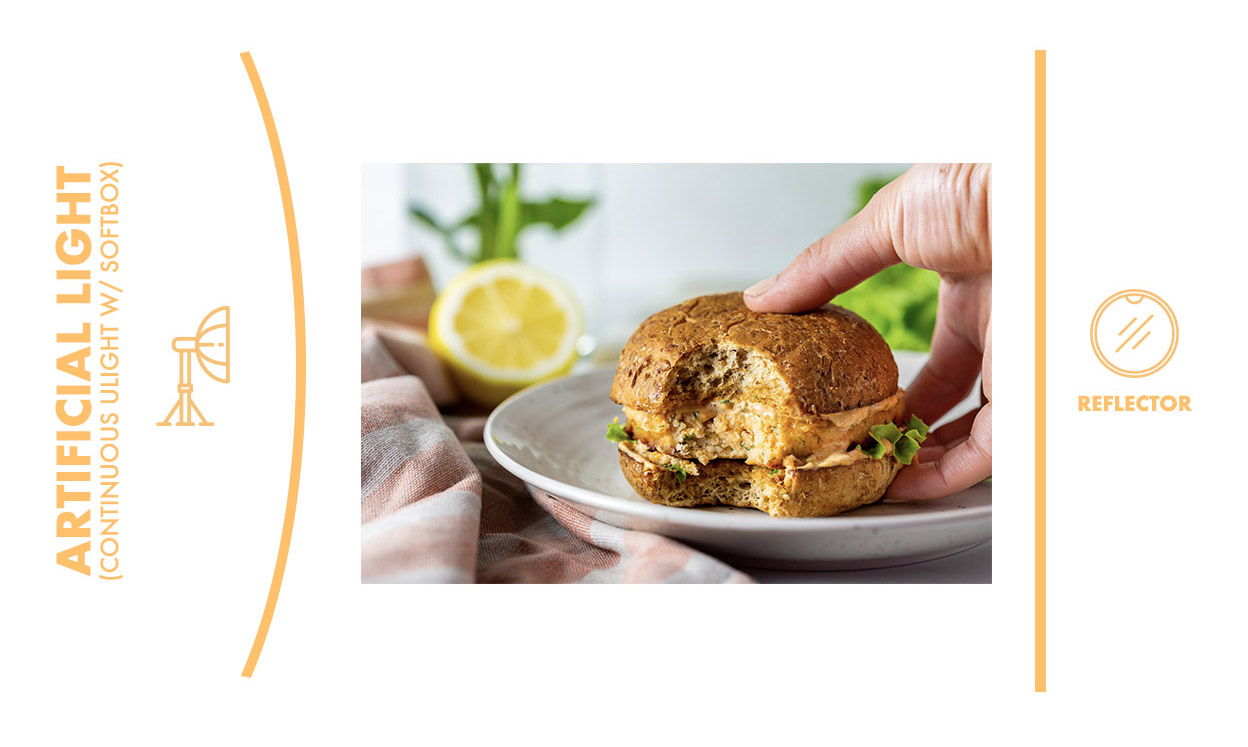
While natural light is excellent for food photography, it does have its downsides. The first downside is, of course, that you can only shoot when the sun is out. If you have a shoot that lasts extra long and the sun starts to set, you’ll have no other option than to pack it up for the day. The other downside is that the light may be inconsistent across images and the sun moves throughout the day. If you’re shooting images for social media, this may not be a big deal. But if you’re looking for a consistent look across all the images in your RangeMe profile, online store or Amazon listing, you’ll want to use artificial lighting.
Here’s the basic kit we recommend if you want to go the artificial lighting route:
Backdrops
The type of backdrops you’ll need will depend on the type of images you’re looking to produce and your brand’s personality. Some brands are more rustic, opting for wood grains and warm tones, while others use only bold colorful backgrounds. Regardless of which bucket you fall into, you will likely find what you need on Amazon:
- Colored and Pattern Background Set (Rolls)
- Background Boards with Legs
- Marble and Wood Backgrounds (Rolls)
If you purchase one of the rolled backgrounds, you will likely need two more stands and clamps to hold them up. You should also be cognizant of the size of the backgrounds relative to the size of the setup you’re looking to shoot. For example, if you’re shooting 10 cereal boxes in one shot, a 24” x 24” background will not be large enough. Lastly, since you’re working with food and beverages, be sure the background is waterproof or water resistant.

Props
Similar to backdrops, props should be selected based on your brand and vision for the imagery. But if you’re curious as to what type of props we utilize the most at Julee Ho Media, they are often light, neutral, solid-colored and modern in style. Avoid purchasing sets of plates or glassware as you’ll likely only need one or two of each item. Below are stores where you can find kitchen props that meet the aforementioned style parameters and allow for you to purchase single pieces.
Try to avoid any items that are high-shine as they typically reflect light in a way that can distract from the focal point of your image. Whenever possible, we like to select matte dinnerware and flatware.
Summary
Creating a basic CPG photography studio doesn’t have to be an overwhelming task. By carefully selecting the right equipment, you can achieve professional-quality images without breaking the bank. Here’s what you’ll need in a nutshell:
- DSLR camera
- 50mm lens
- Tripod
- Table
- Backdrops
- Props
With these essential components in place, your lean photography studio will empower your CPG brand to convey its unique identity and drive unparalleled growth through visually captivating imagery. With a bit of creativity and resourcefulness, your photography studio can be the key to making a lasting impact in the competitive CPG market.
